City versus Country: Trading Places
I was raised in a city, Calgary to be exact and I loved it. For 24 years from ages of 5 to 29, I went to school, grew up, loved, lived, ate and breathed Calgary. There was so much to do in the city and around the city. I had lots of friends, a fairly decent job, I lived in a great neighborhood with an excellent landlord. Yup! Calgary was my city. I loved the Flames hockey team and the Stampeders football team.
But.....some of my fondest memories were summers spent in the country. Summers at my aunt's farm in Manitoba where we slept in the hay loft, raided the garden, swam in the river, and ate fresh caught pickerel at 10 o'clock at night. Or summers spent at Sorrento on the Shuswap lake in beautiful British Columbia where we climbed apple trees and ran barefoot as free as could be. In my heart of hearts, I am a country girl!
After leaving Calgary, I went to live on Vancouver Island in the little town of Chemainus and I must admit I felt culture shock for the first time in my life. You see, Calgary is a very friendly city and when you say "hello" to someone, they say "hello" back. It is easy to make friends in Calgary. So, I expected the same of a small town and it wasn't the same at all. In Chemainus we walked down the street with our dog "Fred" and we would say "hello" to folks and they looked at us like we were axe murderers and run in the opposite direction. It was hard to make friends in Chemainus as well because unless you had grown up or lived in the area for some time, nobody wanted anything to do with you. I missed Calgary terribly and I wondered, what had I done? What made me pack up and move to such a miserable place? I ended up living on Vancouver Island for 13 years. You learn to fit in and eventually you make friends. I love Vancouver Island now and not just because all my family lives there. I still have some very good friends in Chemainus and Nanaimo. It is truly a beautiful place. I also, met the love of my life there and we've been on an adventure ever since.
Part of our adventure was spending a year up in Nunavut. That was interesting and scary all at the same time. The cold was easy to deal with but the social problems that plague the area are not. And that's a whole other blog.
Next we took our adventure to Quebec and we decided very early that Montreal was too big a city for us. So, we settled in Quebec City where we had a lovely condo in the beautiful Saint-Sacrement area, which is close to downtown. We had neighborhood bistros, coffee shops, and boulangeries. There is so much history and culture there. Quebec is a very dynamic and graceful city. We both had good jobs but what we found was that we weren't doing big city things. We weren't taking advantage of the restaurants or the theaters and everything else that cities have to offer. What we really yearned for was to be in the country again.
Now we are on Prince Edward Island and we are very much in the country and couldn't be happier. Pretty much all of PEI is rural, even the capital city of Charlottetown, the biggest center on the island, has a population of only 40 thousand people.
Which brings me to the reason for this blog! I was contemplating all of this when I realized that we are trading places.
There are those people who grew up on the farm, then moved away to go to school and swore they would never go back. They were sick of the smell of manure, the early morning chores, relying on the weather for the production of the crops and constantly keeping the pests controlled. They yearn for something more. They want to be able to walk to a neighborhood grocer to buy their food and eat in restaurants at 10 o'clock at night. Go to concerts to see their favorite bands and go to museums and the ballet.
Their parents eventually get too old to maintain the farm and move to the city to live in an old folks home. The farm is inherited by the children who left and swore they'd never go back and sometimes they do go back and other times the old farm is left to decay. And then, there are those farms that get sold. Who do they get sold to? They get sold to the people from the city who are tired of the rat race, people who are sick of the two hour commute so that they can sit in a cubicle all day long, staring at a computer screen under fluorescent lights. These same people that work 9 to 5, Monday through to Friday. On the weekends they stand in line ups at the big box stores to buy their groceries and supplies for the week and maybe on Sunday they do something fun but then it's back to work on Monday, back to the old grind. Over and over again, week after week. They yearn for something more. They want to grow things, they want to smell the rich earth. They want to experience the quiet, stillness of the country and how dark it gets at night where you can see a million stars. The rural life is laid back in comparison to the rush of the city.
Cities will always be there. People come and people go, but typically cities just get bigger. It is the face of the country where we see the most changes and there seems to be a transformation going on here. There seems to be a strange phenomenon of people moving from city to rural areas and setting up hobby farms and planting different crops than the mass producers, such as small vineyards, greenhouses, or organic crops and that is just to name a few. There are dozens of micro-farms out there growing specific crops for a specific market.
Will we eventually see a change in how farming is done? Will it go back to the way it used to be before big corporations got involved in farming? Does the new farmer want to practice the old ways of farming, keeping the farm small and selling their wares at local markets? I think there is a movement in the works already and people are looking at reducing their food's carbon foot print. Unfortunately, mass production and the cheap prices of goods from China have ruined fair prices to local farmers for their crops, they can't compete.
What we are personally striving to do is to go down the road of self-sufficiency and grow and raise our own food, on our own land. We would love to just live off the grid and reduce our carbon footprint to almost nil. This is our goal!
June 18, 2013
June 8, 2013
Growing Garlic
I like to buy local food: local meats, local produce, local milk ... you get the picture.
When we moved to PEI, we bought as much as we possibly could from local producers. One exception was garlic. Local garlic was selling for $2.50 per bulb. I never buy Chinese garlic, but settle on Californian garlic that is readily available in local grocery stores which typically sells for about $1 per bulb. I would pay up to $1.50 for local garlic but I find it hard to stomach the $2.50 for 1 bulb given the 4 bulb weekly average we consume as a household.
When I complained to a colleague, she informed me that the reason local garlic was so expensive here was that garlic is really hard to grow on PEI. Oh, I thought, that explains it. I walked away from that conversation scratching my head. Something just didn't sit right with me. Hmmmm, I wondered, is it really difficult to grow garlic on PEI?
People turn to gardening for a variety of reasons: freshness, quality, passion, doing-it-yourself, savings. In my case, I decided to try my hand at growing garlic in the hopes of having a fresh, local, quality product that could eventually save my family $520 per year and demystify garlic growing.
Surely, it couldn't be all that hard. I knew that garlic had to be planted in the fall and harvested the following summer so, in October of 2010, I went to the store and picked up two bulbs of California garlic. I opened the garlic bulbs into cloves and walked over to the garden area. I planted them two inches down with the root tip at the bottom, covered them with the soil, watered them a bit, and walked away.
The next spring, garlic started poking its way from the soil. This was very exciting and so far, I hadn't done anything special in terms of work. I just dropped them in the soil.
By around mid July, the garlic scapes were twisting like pig tails. A friend had said when that happens, I should cut the scape off just below the twisting pig tail and this would allow the energy of the plant to focus on bulb production. So, I did. From those scapes, I produced a wonderful garlic scape paste, which I put on pizza. But you could use it the same way you would normally use garlic cloves.
I can't remember exactly when it happened, probably mid August, the garlic appeared to be dried up. So, I pulled them from the ground. From those two bulbs the previous fall, I harvested 10 bulbs!!! We ate a few bulbs, and I planted the rest back to the soil. In the fall of 2012, if I recall correctly, I harvested about 24 bulbs. We ate a couple and I put the rest back into the soil. This August, I am set to harvest about 80 bulbs!!! I'll plant most back into the soil and by the summer of 2014, I should be able to harvest approximately 200 bulbs. At that point, I'll have enough garlic to feed our garlic addiction throughout the year and plant enough for the following year.
Last fall, I thought I would try something different. I noticed that bugs left the garlic plants alone. After having read about companion planting, I decided to plant the garlic around our fruit trees (apples and cherries) in the hopes of keeping the pests off of the trees. I also decided to add some quality compost to the process as the trees need the rich soil.
The garlic is doing great and the trees seem to be doing better than last year with fewer pests on them. So, you see, growing garlic is very difficult and growing garlic on PEI is especially difficult! LOL. One of the best things about growing garlic is that it's not sensitive to frost. We have had a few good frosts this May after the spring thaw but the garlic doesn't care. It just keeps on growing.
When we moved to PEI, we bought as much as we possibly could from local producers. One exception was garlic. Local garlic was selling for $2.50 per bulb. I never buy Chinese garlic, but settle on Californian garlic that is readily available in local grocery stores which typically sells for about $1 per bulb. I would pay up to $1.50 for local garlic but I find it hard to stomach the $2.50 for 1 bulb given the 4 bulb weekly average we consume as a household.
When I complained to a colleague, she informed me that the reason local garlic was so expensive here was that garlic is really hard to grow on PEI. Oh, I thought, that explains it. I walked away from that conversation scratching my head. Something just didn't sit right with me. Hmmmm, I wondered, is it really difficult to grow garlic on PEI?
 |
| Garlic -- May 2013 |
Surely, it couldn't be all that hard. I knew that garlic had to be planted in the fall and harvested the following summer so, in October of 2010, I went to the store and picked up two bulbs of California garlic. I opened the garlic bulbs into cloves and walked over to the garden area. I planted them two inches down with the root tip at the bottom, covered them with the soil, watered them a bit, and walked away.
The next spring, garlic started poking its way from the soil. This was very exciting and so far, I hadn't done anything special in terms of work. I just dropped them in the soil.
By around mid July, the garlic scapes were twisting like pig tails. A friend had said when that happens, I should cut the scape off just below the twisting pig tail and this would allow the energy of the plant to focus on bulb production. So, I did. From those scapes, I produced a wonderful garlic scape paste, which I put on pizza. But you could use it the same way you would normally use garlic cloves.
I can't remember exactly when it happened, probably mid August, the garlic appeared to be dried up. So, I pulled them from the ground. From those two bulbs the previous fall, I harvested 10 bulbs!!! We ate a few bulbs, and I planted the rest back to the soil. In the fall of 2012, if I recall correctly, I harvested about 24 bulbs. We ate a couple and I put the rest back into the soil. This August, I am set to harvest about 80 bulbs!!! I'll plant most back into the soil and by the summer of 2014, I should be able to harvest approximately 200 bulbs. At that point, I'll have enough garlic to feed our garlic addiction throughout the year and plant enough for the following year.
Last fall, I thought I would try something different. I noticed that bugs left the garlic plants alone. After having read about companion planting, I decided to plant the garlic around our fruit trees (apples and cherries) in the hopes of keeping the pests off of the trees. I also decided to add some quality compost to the process as the trees need the rich soil.
 |
| Garlic Growing Around Cherry Tree -- May 2013 |
 |
| Garlic Growing Around Apple Tree -- June 2013 |
May 11, 2013
May 6, 2013
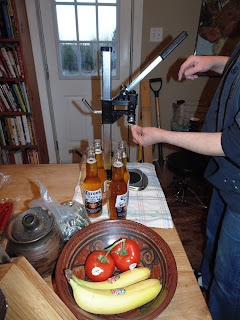
Bathtub Beer 101 - The End Product
It's been about two weeks since bottling and now it's time to test our beer!


Bathtub Beer 101 - The End Product
It's been about two weeks since bottling and now it's time to test our beer!

Notice the color and clarity of the beer; it's a thing of beauty.

Time to crack a cold one.

The pour.

There we go, just a twist of lime and then we can quaff it down. It's not as carbonated as I would like, but we have a cold house so that plays a factor. No worries, it will become more carbonated as time goes by. This beer tastes pretty darn good! Cheers :)
April 28, 2013
April 21, 2013
Bathtub Beer 101 Day #3
It's been another 7 days at this point and now it's time to bottle the beer! Hooray!


It is important to leave all the sediment behind if you are wanting a clear beer. What's left behind, as in the picture above, will simply go down the drain with the rinse water.


Bathtub Beer 101 Day #3
It's been another 7 days at this point and now it's time to bottle the beer! Hooray!

It may be hard to tell from this picture but the beer has cleared up quite a lot, you can almost see through the carboy and look at the color. It looks really good.

Do you see the sediment on the bottom? That is sediment that will not go into your beer bottles and that my friends is a good thing.

At this point you will want to make a simple syrup with one cup of water and two cups of dextrose (corn sugar), no need to stir just heat until sugar is dissolved. Take the water and sugar mixture off the heat and let it cool to room temperature. In the meantime, you'll want to get the bottles and equipment sterilized.

No, I do not use my bathtub to sterilize the bottles. I use the kitchen sink, but the process for sanitizing your work area is the same as with your bathtub! Clean, clean, clean! Also, I use the same solution of Aseptox and water (1 Tbsp to 1 gallon of water) to sterilize the bottles as with the equipment. I sterilize 12 bottles at a time as that is what will fit comfortably in one compartment of a two compartment sink. First I rinse the bottles out to get rid of any dust or bugs that may have crawled in while in storage. It helps if you rinse your bottles before storage, it makes this process a lot easier than having to get a bottle brush to scrub out your bottles because they are full of mold from not rinsing them prior to storage.
Depending on what type of bottles you are using, ( I use 341ml to 355ml bottles) you will probably need to sterilize about 66 bottles. Remember, the bigger the bottle, the longer it will take to carbonate.

I let the Aseptox and water solution sit in the bottles for about 15-20 minutes, then I transfer that solution into the 12 waiting rinsed out bottles and then I rinse the sterilized bottles out really well and turn them upside down in the clean and sterilized dish rack (as shown above.)

The other equipment you will need for this step is: a primary fermenter, a siphoning tube, and a really big spoon. And, yes, the clean and sterilized bathtub to clean and sterilize your equipment!

Once your equipment is cleaned, sterilized, and rinsed out, it's time to transfer the beer back into your primary fermenter.

Try using a clothes pin (as shown above) to keep the siphoning tube above the sediment when siphoning the beer from the carboy.


Remember the simple syrup you made and left to cool at room temperature? Add it to the beer that has been transferred into the primary fermenter and give it a gentle but thorough stir. Set the primary fermenter on a stable surface about 2-3 feet off the ground, like in the picture shown above, with the 66 cleaned and sterilized beer bottles below on the floor. You are now ready to bottle your beer.

Using the siphoning tube, fill the bottles to within an inch of the top of the bottle. It may foam up a bit and this is normal, just go back a little later after the foam reduces and add more beer to the bottle.

Close up shot!

When all your bottles are filled, you will need to cap them. There are all kinds of different cappers available and some you can rent. I like this one, it's light weight, easy to use, and costs about $50. As you can see in the picture above, it has a magnetic holder for the cap.

With this model you want to place the adjustable arm about a quarter of an inch above the top of the bottle. That makes it easier to cap the bottle. Just press down on the arm until the cap is secured.

Et voilà! One capped beer bottle. Just 65 more to go.

Alright, once you are done with capping, store the beer in a warm, dark place for two weeks. Note, sunshine and light are not a beer's friends. After the two weeks are up your beer will be ready for drinking. Serve chilled with a twist of lime. Yummy! Remember beer like wine will improve with age but who wants to wait that long? Especially since it's taken a month to produced this lovely beverage.
Please drink responsibly.
April 18, 2013
Bathtub Beer 101 Day #2
April 14th, 2013
It's been 7 days and now it's time for the second step. Most kit instructions will tell you that it's time to bottle the beer by sterilizing your bottles and adding 1/2 tsp. of dextrose to each bottle before adding the beer to the bottle and then capping the bottle after you've filled it. However, I like to add an extra step to this process to ensure a nice crisp clean beer.


It's been 7 days and now it's time for the second step. Most kit instructions will tell you that it's time to bottle the beer by sterilizing your bottles and adding 1/2 tsp. of dextrose to each bottle before adding the beer to the bottle and then capping the bottle after you've filled it. However, I like to add an extra step to this process to ensure a nice crisp clean beer.

First, you have to sterilize your bathtub just like you did on day one. Then, you want to clean and sterilize all the equipment that you will need for this next step.

Remember this stuff? 1 Tbsp per gallon of water to sterilize the equipment.

For step two you will need a carboy (glass or plastic), an airlock, and a siphoning tube.

If you are using a glass carboy be very careful because if you drop it in the tub it could break and that's a little scary. In the 20 years I've been doing this I've only broke one carboy (knock on wood). Again, with the carboy you want to sterilize all sides, so rotate the carboy every 15 - 20 minutes.

Sterilize the top end, too! As in the picture above, I have the carboy flipped over in a container big enough to support the carboy without falling over.

The yeast at this point has done it's job, the beer must is not foaming or bubbling anymore but it is still very cloudy and that's why I do the second step. We're going to clear this baby up!

After the equipment is cleaned, sterilized, and rinsed out really well, it's time to start transferring the beer from the primary fermenter to the carboy. In our house this is a family affair.
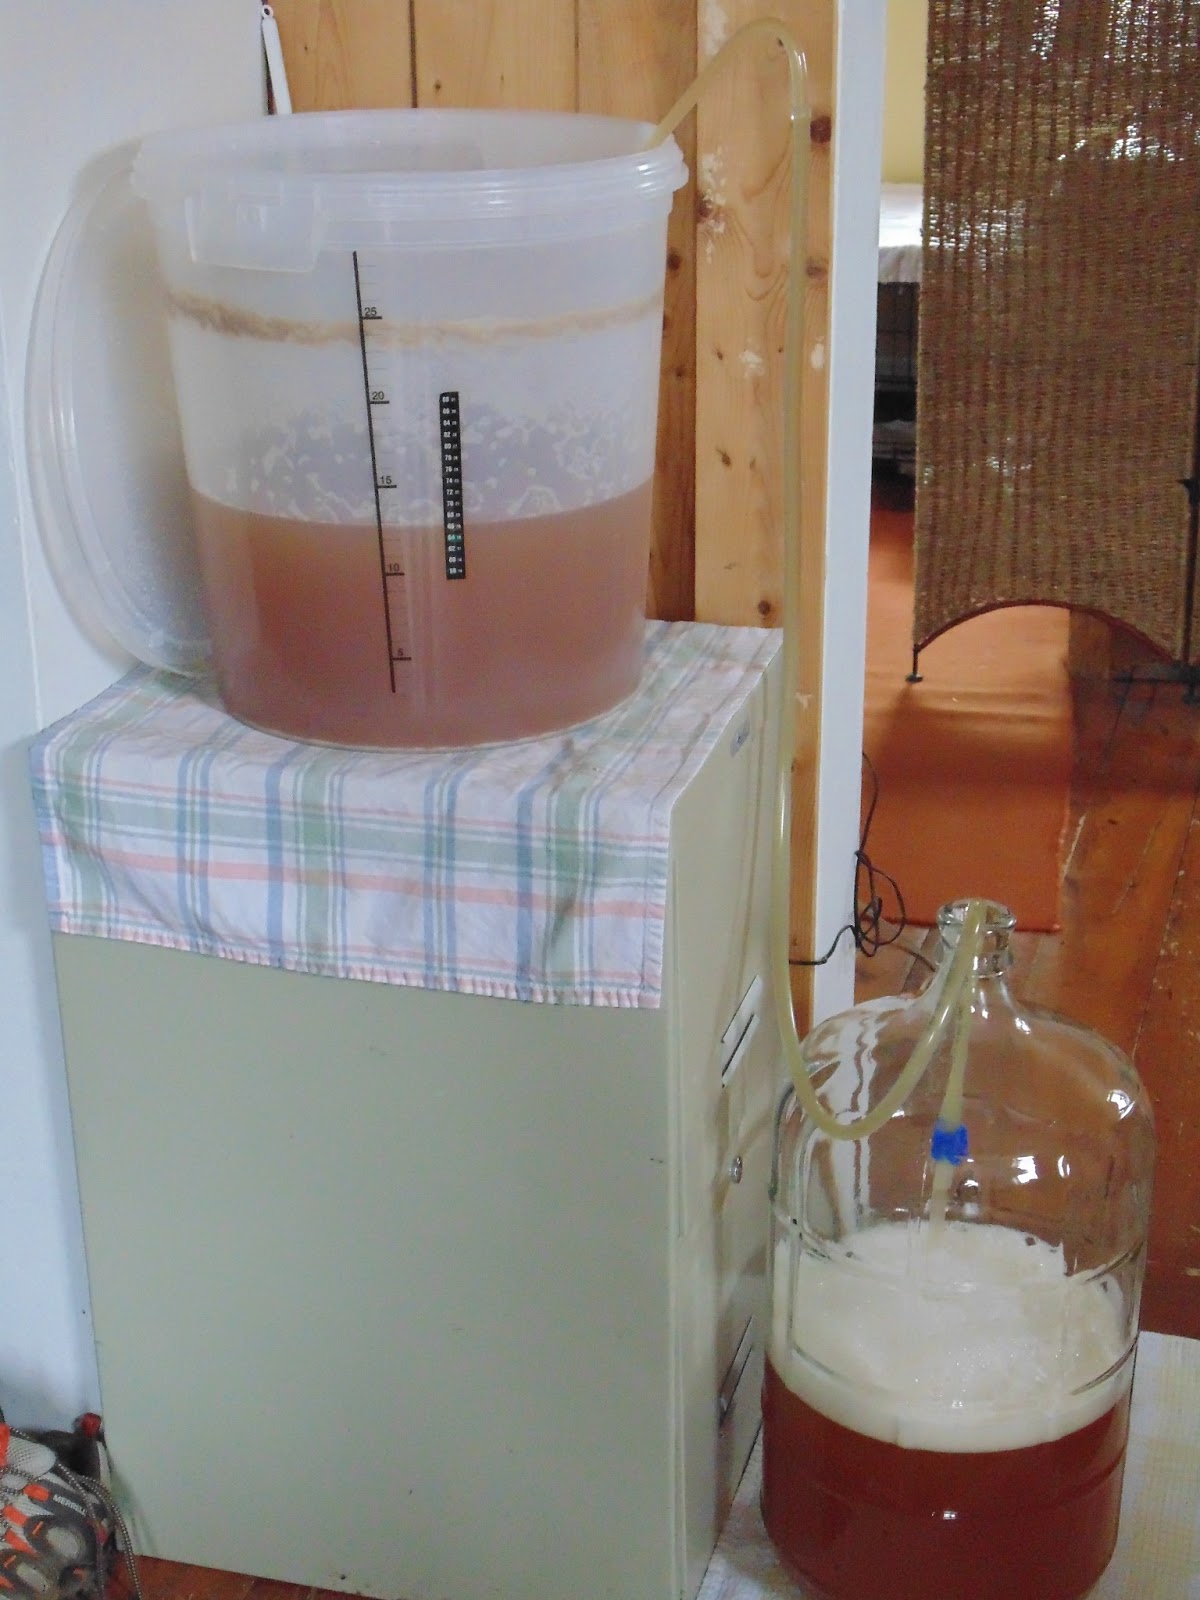
This process should only take about 20 minutes. Try to siphon as much beer as possible without disturbing the sediment on the bottom of the primary fermenter.

Once you are done transferring the beer to the carboy, place the carboy about 3 feet off the ground, like in the picture above. Do not top up the carboy with water (it's not necessary) just put an airlock filled half way with water on the top of your carboy.
Okay, that's it for day two of Bathtub Beer 101. The beer will clear up considerably in the next 7 days and at that time we will bottle the beer.
April 9, 2013
Bathtub Beer Making 101
Why Should You Make Beer My Way?
I like to make beer from a beer kit, however, I do things differently. If you have made beer from a kit and have been disappointed by the cloudiness, taste, or sediment in the bottom of the bottle, I encourage you to toss out the instructions and try my method.
I have been making beer this way for over 20 years and always have excellent results. This method will yield clear, crisp, and tasty beer!

What could be more ancient than beer making? 7000 years of history in the production of beer and one of the oldest beverages known to mankind.
When I tell people that I make beer in my bathtub, they look at me in a strange way and it's no wonder. I don't actually make beer in my bathtub, I merely sterilize the equipment in the tub. I do this because I don't have a laundry sink in my home and I need a big vessel in which to splash around a lot of water and not have to worry about making a mess.

Day #1 of Bathtub Beer Making 101 (Sunday, April 07, 2013)
First, I sterilize the bathtub with Comet and a scrubby. Then rinse out of tub really well. I can not stress enough about keeping everything that comes in contact with the beer clean, including yourself. Wash your hands often and wear clean clothes.

Next, I clean and rinse all the equipment that I'm going to use for starting the beer. Then, I sterilize the equipment with Aseptox and water as per instructions on the picture above (ie. 1 Tbsp per gal of water).

Stir the aseptox and water solution.

Because I use only one gallon of water and Aseptox solution, I tilt and rotate the primary fermenter bucket so the solution will reach all the sides. Note that I have another smaller bucket underneath the bigger bucket so that the solution doesn't drain out. I also keep the solution in place for 15-20 minutes per side (ie: 4 sides = approximately 1 hour of time to sterilize the entire fermenter).

Today, I am using a beer kit ( see picture above.) One day I plan to try making beer from scratch. There is a grain elevator in Georgetown, PEI where I can get barley and other grains and I have a friend that grows cascade hops in his backyard. I hope to be able to use these products and make beer from scratch when I have a little more time.
When it comes right down to it, a beer kit only cuts out a couple of steps from the beer making process and it's cheap and easy to do. This beer kit cost me around $20 and another $4 for the dextrose, $1.60 for the caps and I already had the bottles from previous beer purchases. So, for an investment of under $30, I will get 5 and a half dozen beers which works out to be around .38 cents per beer. WOW!

Now you need to heat up the can (barley goop --- clearly not the technical term) in hot water for around 10 minutes. This will make it easier to pour later.

Get your sugar ready. I use one kilo plus one cup, I like my beer a little stronger. I have never actually taken the specific gravity of the must prior to fermentation so I don't know what the alcohol content is, I just know that this amount seems to work well.

Boil 3 and a half litres of water in a pot. Now, you want to open and pour your warmed up can of barley goop into your sterilized primary bucket, add the boiled water, and stir well. Add the dextrose and stir again to dissolve the sugar.

Top up your primary fermenter with cool water to the 23 litre mark and stir mixture really well. Make sure the temperature is no higher than 24 degrees Celcius before adding the yeast.

Add the yeast.

The yeast should be evenly distributed on top of the solution.

Give it a gentle stir.

Put a cleaned and sterilized lid on the primary fermenter.

Keep the primary fermenter of beer in a warm place for 7 days. This concludes
Day #1 of Bathtub Beer Making 101. Stay tuned for Day # 2 on Sunday April 14th.
April 7, 2013
What is Old World Knowledge
Old
World Knowledge is the brainchild of Lori Thomas, Jocelyne Martin, and
Christopher Church. Together we hope to revive skills and understanding that
used to be common knowledge but has been lost in modern life.
We
will cover topics that interest us, and we hope will interest you too. We'll
cover how to grow and prepare certain foods from scratch, how to build and make
things, and how to do things that have become mysterious to most of people.
We’ll
do this by sharing what we’ve learned since moving to rural Prince Edward
Island, Canada, and what we will continue to learn on our journey to
self-sufficiency. Taking the mystery out of this lost knowledge and applying a
modern approach, we hope to learn how things used to be done and empower
ourselves and others to become more closely connected with our respective
lives.
Subscribe to:
Comments (Atom)