Bathtub Beer 101 Day #3
It's been another 7 days at this point and now it's time to bottle the beer! Hooray!
It may be hard to tell from this picture but the beer has cleared up quite a lot, you can almost see through the carboy and look at the color. It looks really good.
Do you see the sediment on the bottom? That is sediment that will not go into your beer bottles and that my friends is a good thing.
At this point you will want to make a simple syrup with one cup of water and two cups of dextrose (corn sugar), no need to stir just heat until sugar is dissolved. Take the water and sugar mixture off the heat and let it cool to room temperature. In the meantime, you'll want to get the bottles and equipment sterilized.
No, I do not use my bathtub to sterilize the bottles. I use the kitchen sink, but the process for sanitizing your work area is the same as with your bathtub! Clean, clean, clean! Also, I use the same solution of Aseptox and water (1 Tbsp to 1 gallon of water) to sterilize the bottles as with the equipment. I sterilize 12 bottles at a time as that is what will fit comfortably in one compartment of a two compartment sink. First I rinse the bottles out to get rid of any dust or bugs that may have crawled in while in storage. It helps if you rinse your bottles before storage, it makes this process a lot easier than having to get a bottle brush to scrub out your bottles because they are full of mold from not rinsing them prior to storage.
Depending on what type of bottles you are using, ( I use 341ml to 355ml bottles) you will probably need to sterilize about 66 bottles. Remember, the bigger the bottle, the longer it will take to carbonate.
I let the Aseptox and water solution sit in the bottles for about 15-20 minutes, then I transfer that solution into the 12 waiting rinsed out bottles and then I rinse the sterilized bottles out really well and turn them upside down in the clean and sterilized dish rack (as shown above.)
The other equipment you will need for this step is: a primary fermenter, a siphoning tube, and a really big spoon. And, yes, the clean and sterilized bathtub to clean and sterilize your equipment!
Once your equipment is cleaned, sterilized, and rinsed out, it's time to transfer the beer back into your primary fermenter.
Try using a clothes pin (as shown above) to keep the siphoning tube above the sediment when siphoning the beer from the carboy.
Remember the simple syrup you made and left to cool at room temperature? Add it to the beer that has been transferred into the primary fermenter and give it a gentle but thorough stir. Set the primary fermenter on a stable surface about 2-3 feet off the ground, like in the picture shown above, with the 66 cleaned and sterilized beer bottles below on the floor. You are now ready to bottle your beer.
Using the siphoning tube, fill the bottles to within an inch of the top of the bottle. It may foam up a bit and this is normal, just go back a little later after the foam reduces and add more beer to the bottle.
Close up shot!
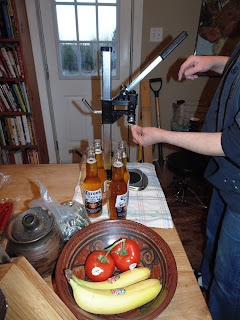
When all your bottles are filled, you will need to cap them. There are all kinds of different cappers available and some you can rent. I like this one, it's light weight, easy to use, and costs about $50. As you can see in the picture above, it has a magnetic holder for the cap.
With this model you want to place the adjustable arm about a quarter of an inch above the top of the bottle. That makes it easier to cap the bottle. Just press down on the arm until the cap is secured.
Et voilà! One capped beer bottle. Just 65 more to go.
Alright, once you are done with capping, store the beer in a warm, dark place for two weeks. Note, sunshine and light are not a beer's friends. After the two weeks are up your beer will be ready for drinking. Serve chilled with a twist of lime. Yummy! Remember beer like wine will improve with age but who wants to wait that long? Especially since it's taken a month to produced this lovely beverage.
Please drink responsibly.


No comments:
Post a Comment